DIY CEILING FAN INSTALLATION GUIDE
A ceiling fan adds beauty and cool air to any room of your home, but installing one yourself might seem like a challenging task. With a few easy steps and a bit of patience, you can perform your own ceiling fan installation in no time. Read on for some steps that will help you perform your very own DIY installation so you can enjoy the perks of having a ceiling fan in your favorite space.
Gather Your Tools
Before you can perform any ceiling fan installation, you’ll need to make sure you have some basic tools. If the fan doesn’t include a support brace, you can find one at most home improvement stores.
Other tools you’ll need will include a ladder, some wire cutters, and a screwdriver. Make sure you read the instructions that come with your ceiling fan thoroughly, as they typically include a detailed list of all the tools you’ll need. Before you prepare to install the ceiling fan, make sure that the electricity is turned off in the room. You can do this by finding the breaker labeled for the room and flip it to the off position.
Never install any light fixture or other hard-wired device without turning off the power first. If you have family members who come in and out of the home, leave a note in bold letters telling them to leave the breaker alone while you’re working.
Use a Ceiling Support Brace
Ceiling fans are heavy, so you’ll need to install a support brace between the ceiling joists before installing the fan. Most ceiling fans weigh up to 50 pounds. If you don’t have access to the joists from the inside, you may need to get to them through the attic. Most of the time, you’ll probably install your new fan in a spot where a different light already existed. If not, you will need to cut a hole in the ceiling drywall to accommodate the fan.

Ceiling Fans
Scope
Install efficient ceiling fans such as rated ceiling fans, to provide efficient supplemental cooling.
Follow local code requirements.
Measure the room and select an appropriately sized fan for the space.
If the fan will include a light kit, install energy efficient LED or CFL bulbs.
Provide ceiling fan documentation to the home owners to ensure proper operation and maintenance.
Two-thirds of American households now have ceiling fans. Sales to do-it-yourselfers account for a brisk and growing business at home improvement centers. A 2011 Home Energy Magazine article claims that it is not uncommon for builders to install ceiling fans in nearly every bedroom and living area of many new homes.
Ceiling fans are electrically powered, ceiling-mounted fans that create air movement which can encourage evaporation and make people feel cooler. Research has shown that, during warm weather, the thermostat can be raised as much as 4°F with no noticeable reduction in comfort if a ceiling fan or other source of air flow is present
Ceiling fans can supplement traditional HVAC systems, but cannot duplicate the wide range of functions HVAC systems perform. While they can circulate the air, they cannot heat, cool, filter or dehumidify it, and they do not provide ventilation.
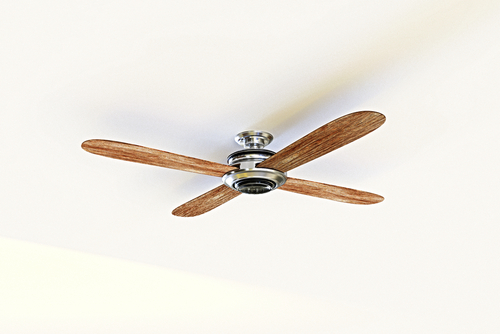
Ceiling fans can be installed in rooms with ceilings that are at least eight feet high. For optimal airflow, they work best when the blades are 7 to 9 feet above the floor and 10 to 12 inches below the ceiling. They should be installed so their blades are no closer than 8 inches from the ceiling and 18 inches from the walls.

Ceiling Fan Installation Guide And Tips
In case you are about to buy a new ceiling fan for your home, then you are on the right track. When you start comparing all the options that are available to you, you may end feeling very helpless due to many decisions available. In addition to that, installation part also waits for you. But with the current technology, you need not worry so much. All information is always available for use.
Below are basic tips that will help choose the best ceiling fan and some tricks of installing it.
Size of the room to install the fan
One of the principal things that you have to consider is the span of the room where the fan will be installed. You additionally need to think about how possible it is that you will install one of these things outside. Indoor fans are not going to have the capacity to be used outside, so you have to get one that is appraised for that purpose specifically. It will help it to confront any climate and lessen the likelihood of serious problems happening as a result of overabundance dampness or different difficulties related to a presentation of the components.
How high is the ceiling?
In case you have a tall ceiling, you can either install the fan near the ceiling itself, or you can get an expansion with the goal that it hangs down nearer to the living zone. If you have a low ceiling, you truly should be wary about installing a fan that will stick too far down into the room. Nothing very damages like putting your hand not yet decided and having your knuckles raked with the blades of a ceiling fan. They have a few fans that are available for this purpose install near the ceiling and will keep them up and distant generally.
Who will require the fan?
When you are finishing your kids’ room, it is critical that you let everything match perfectly well so that the tyke feels more at home and appreciate the room that he or she will rest in. It is likewise vital that keep your tyke’s room very much ventilated while as yet ensuring his or her security at all circumstances. These are the things that make it so natural to see that installing a decent and durable ceiling fan can spruce up your children’s rooms.
Parts and components of the room
One other thing that you can consider is the different elements that will be available on the ceiling fan itself. For instance, would you be able to utilize a tiny bit all the lighter in the room? If Thus, there are light units that are available on numerous ceiling fans that are as of now available. You likewise have different styles, hues, some blades thus a wide range of options that you are certain to discover one which is perfect for your living zone. For whatever time that you make sure that it is practical as well as helpful, you are certain to be content with the decision that you make.
Period of the year like summer
Ceiling fans in the late spring should be spun subterranean insect clockwise. Ceiling fans don’t make the air cooler, yet they make the air feel cooler by making an indoor breeze. Ceiling fans flow the air in the room, disposing of that stuffy feeling. The ceiling fan may allow you to kill the AC through and through. The air movement around your room can make it feel cooler.
Purpose of the ceiling fan
Ceiling fans can be vitality savers. Since warm air is somehow light than cool air, the warm one ascends. This implies in the winter; the truly necessary warm air is up close to the ceiling. In the winter months, attempt to run your ceiling fan in a clockwise heading. The fan will drive the warm air up against the ceiling, and down the dividers, beating up the air in the room, along these lines, making it hotter. Since the fan is turning clockwise, it won’t cool the room beneath with any draft. Winter time ceiling fan clients have been known to spare 10% on their warming during the winter months.
How Much Does It Cost To Install A Ceiling Fan?
Ceiling Fan Installation Cost
The average cost of ceiling fan installation is $75 to $150 with most homeowners spending around $150 to $350 for both parts and labor. Hiring a handyman costs $50 to $80 per hour to install ceiling fan and typically takes 1.5 to 2 hours. If a professional is needed, an electrician’s hourly rate averages $85–$100 per hour and it will usually take two hours or more for new wiring.
If you need to cool a room in your home without huge expense, a ceiling fan will help considerably by moving stale air and introducing breeze at a reasonable price. Let’s go over the cost factors that will affect the cost of installing a ceiling fan.
Cost To Replace Ceiling Fan
With a wide range of ceiling fan products on the market, you can a spend little or a lot depending on the features you want and the brand you choose. Ceiling fans are not always increasingly more expensive as the blade span increases in size. You can find more ornate, higher-end 36” fans for the same price as a more entry level 72” fan. Entry level 29” ceiling fans start around $30 and can go as high as $1,100, and on the other end of the scale, 72” fans can start around $180 and go as high as $1,300.
Ceiling Fan Types
Standard – This is the most common fan found in residential homes. Standard ceiling fans usually have 5 blades and come with a built-in light fixture. Average costs range from $50 to $300.
Low Profile – Low-profile fans are suitable for a home with ceilings 8’ or under and keep the blades close to the ceiling. Also known as flush mount or hugger-fans. Like standard fans, average costs range from $50 to $300.
Hanging Propeller – This fan is built for ceilings 9’ or higher and is hung down from a downrod, which keeps the blades at around 7’ from the floor. Typical costs range from $150 to $550
Directional – Similar to a standing fan, directional fans can be pointed in any direction you would like. They can cost anywhere from $150 to $800+
Rotational – Rotational fans are dual-motor fans with dual-heads. Each head rotates on a downrod axis and can be pointed in any direction. These fans cost $200 to $1,500+ on average.
Installing Ceiling Fan With Downrod
The standard minimum distance between the floor and the blades of a ceiling fan is around 7 feet. Most homes have an 8-foot ceiling height, so homeowners will either have the ceiling fan mounted flush with the ceiling or with a low-profile 3” to 6” pole called a downrod. For ceilings with a height greater than 8 feet, installers will use a pole to connect the motor housing of the ceiling fan to the ceiling mount. Depending on the size and finish you need, your costs will land somewhere between $6 for a 3” and $80 for a 72” rod.
CEILING FAN INSTALLATION
Ceiling fans are both functional and decorative. They are particularly useful in the summer, since they effectively reduce energy usage while creating a cool breeze. They can also be used in the winter to gently pull heated air away from the ceiling where it tends to collect. Light kits can be added to increase the usefulness of many ceiling fans. A wide range of both fan and light kit styles is available, providing choices that will contribute to the beauty of any room. This how-to provides general instructions for installing a ceiling fan and should give you a feel for what is involved. Remember, however, to always consult the manufacturer’s instructions during actual installation.
Before You Begin
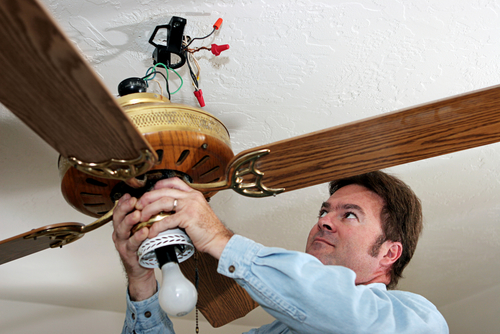
To ensure that your fan is securely mounted to the ceiling and for your safety during installation, read all of the instructions packed with your fan. Since ceiling fans are usually used to replace existing light fixtures, the wiring to the fan should already be complete. Installation is not difficult, and only requires that you pay attention to the instructions included with the fan. If additional wiring must be done to install your fan and you are not familiar with wiring, consult a professional electrician. All wiring must conform to local and national codes.
When working with electricity always:
Turn off the power.
Test the wires to ensure the power is off.
Lock the panel box, so no one can accidentally turn the power back on while you are working.
Check with local authorities to see if a permit is required.
Have your work checked by an inspector.
Wear eye goggles and a dust mask.
To avoid overloading the circuit, consult a licensed electrician.
Read all instructions and safety information completely. To reduce the risk of fire or electric shock, do not use the fan with any solid-state speed control device or variable speed switch unless specifically designed for use with a ceiling fan. Do not mount the ceiling fan to a plastic electrical box. Use a metal box securely fastened to the building structure.
An appropriate junction or outlet box securely attached to the building structure is required. Replace the old box with one labeled as approved for ceiling fans or ceiling suspended “paddle” fan installation. The box and its support must be able to support the moving weight of the fan. Use the installation hardware recommended by the junction box manufacturer. Fans of over 35 pounds, with or without accessories, require additional support independent of the outlet box.